How to create your own Experience App
Intro
Next to Classic and Advanced Experiences, you can now also create your own Experience App. It’s designed to help our customers build their own immersive experiences, in-house or with their preferred agency. So they can enjoy all the power of Showpad.
Why build an Experience?
- An Experience is built with HTML, CSS and JS, so you’re only limited by your imagination.
- Integrate easily with Showpad using the Javascript API and the REST API
- Make your Experience configurable so the marketing admin can make adjustments.
Architecture
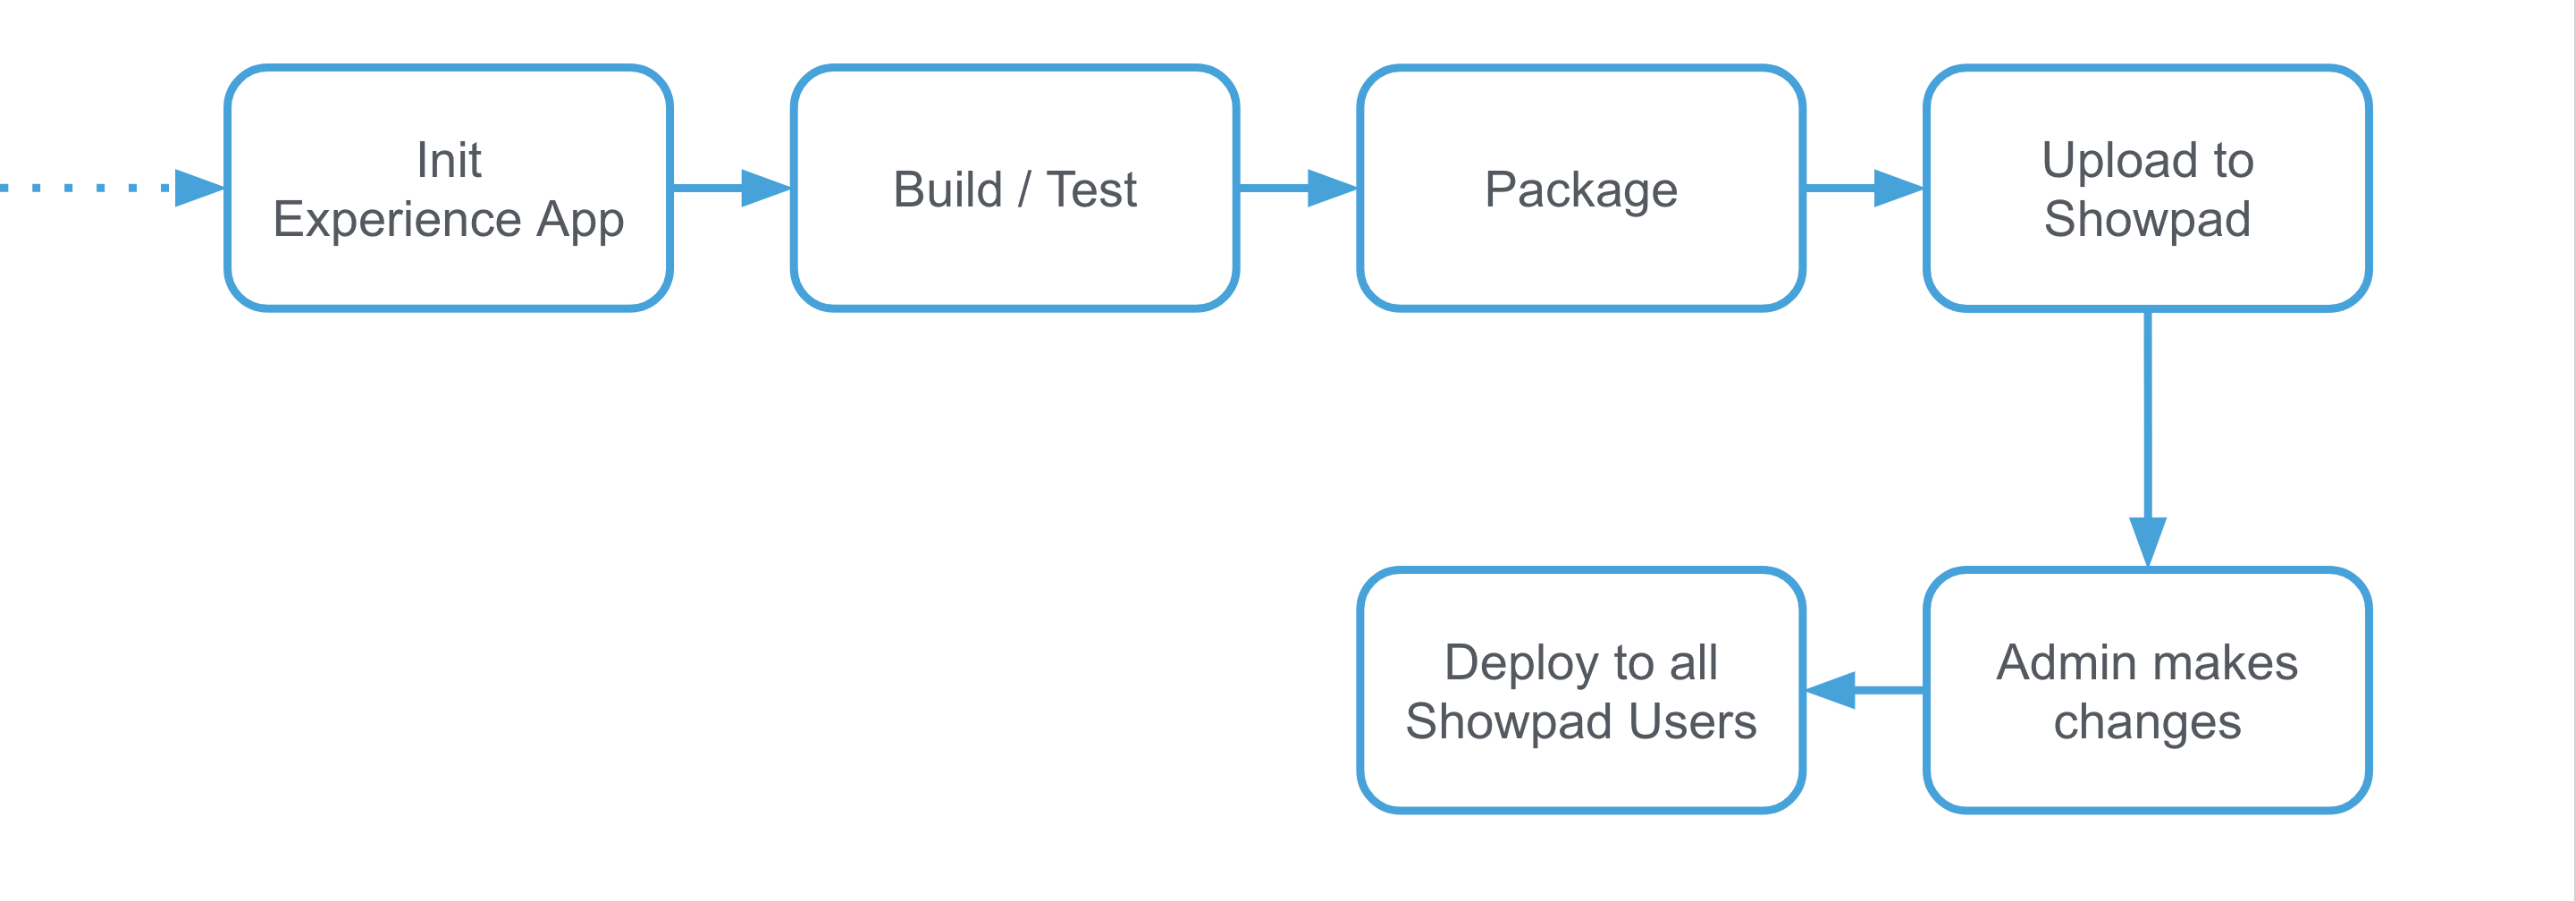
The workflow
Technical definition of an Experience App
An Experience App is a package with the .showpad-extension, that contains 3 required files:
| Filename | Description |
|---|---|
| index.html | The entrypoint |
| manifest.json | The general information about the Experience App |
| config.json | The configuration of the App that can be overwritten by the admin |
Next to these files, the package can then contain the compiled source code and resources of your app.
Manifest.json
The manifest contains general information about your Experience App like a unique identifier, version, name,…
{
   "identifier": "com.showpad.showtime.demo",
   "name": "Showtime Demo",
   "version": "1.0.0",
   "description": "A demo Experience for Showtime",
   "author": "Showpad"
}
Config.json
This file contains the configuration which the marketing admin can change in the Online Platform of Showpad.
It should follow this structure:
| Key | Description |
|---|---|
| version | The version of the configuration structure. Currently at version 1 |
| labels | Everything related to text and copy |
| contents | All links to Showpad assets, tags, channels, folders or urls. |
The values you provide in this file can be overwritten by the marketing admin.
But we have separate page with a more detail explanation.
{
   "version": 1,
   "labels": {
       "homepage": {
           "title": "Your own Experience",
           "subtitle": "How to get started with your own Experiences."
       },
       "slide1": {
           "title": { "value": "Getting Started", "description": "Title for the first slide"},
           "contents": "This Experience thing is going to be YUUGE"
       }
	...
   },
   "contents": {
       "slide1": {
           "presentation": { "type" : "asset", "value" : "d5d7736f4ecf8106f0be8ba35d11a2c4" }
       }
	...
   }
}
Index.html
This is the entrypoint of your Experience App.
When your app is opened in Showpad, it’s loaded inside an iframe or webview like this: index.html?app=xxx&configUrl=yyy.
xxxis the application where it is run. Possible values areios,web,android,windows,gmail,outlook. So this represents the Showpad Client, not the operating system.yyyis the encoded url where the configuration can be found.
<html>
<head><title>Showtime Demo</title></head>
<body>
   <h1 id="title">Hello Showtime!</h1>
   <div id="content"></div>
   <script src="app.js"></script>
   ...
</body>
</html>
App.js
Example javascript-file
window.onShowpadLibLoaded = function () {
  initApp();
};

function initApp() {
  var queryParams = readQueryParams(window.location.search);
  var configUrl = decodeURIComponent(queryParams['configUrl']);

  var xhr = new XMLHttpRequest();
  xhr.addEventListener("load", function() {
    if (xhr.readyState === xhr.DONE && xhr.status === 200) {
      var config = JSON.parse(xhr.responseText);
      var titleEl = document.getElementById('title');
      titleEl.innerHTML = config.labels.homepage.title.value;
    }
  });
  xhr.open("GET", configUrl);
  xhr.send();
}

function readQueryParams(params) {
  return params.substr(1).split("&").reduce(function(acc, pair) {
    if (!pair) {
      return acc;
    }
    var parts = pair.split("=");
    acc[parts[0]] = parts[1];
    return acc;
  }, {})
}
Config.json
Throughout the whole process of developing, uploading, making changes and deploying to all the Showpad users, there are 3 slightly different versions of your Experience App. Where the 3 versions live is visible in the image below.
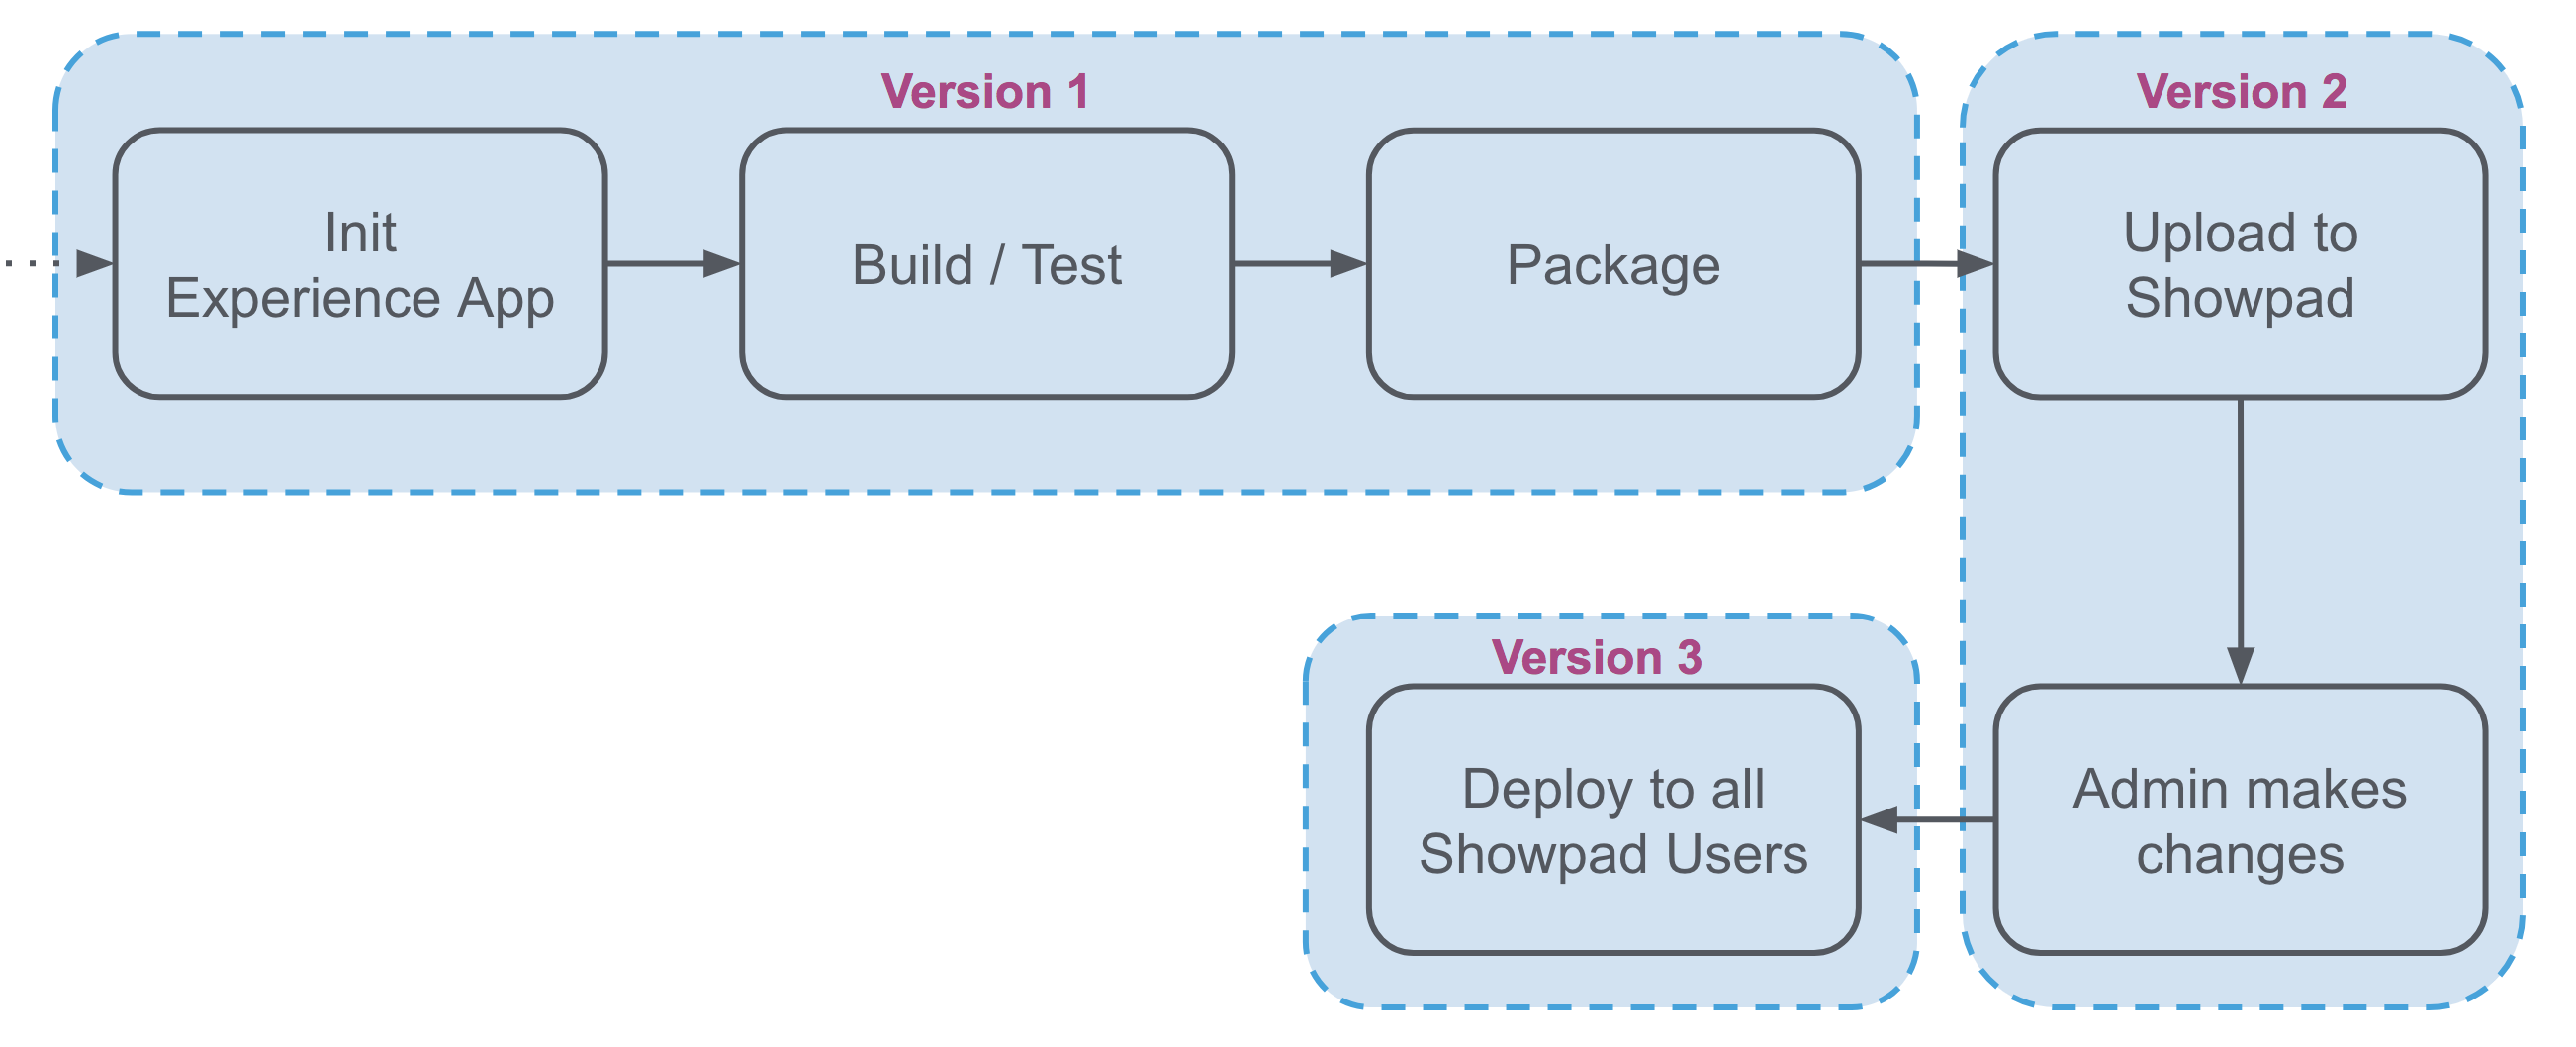
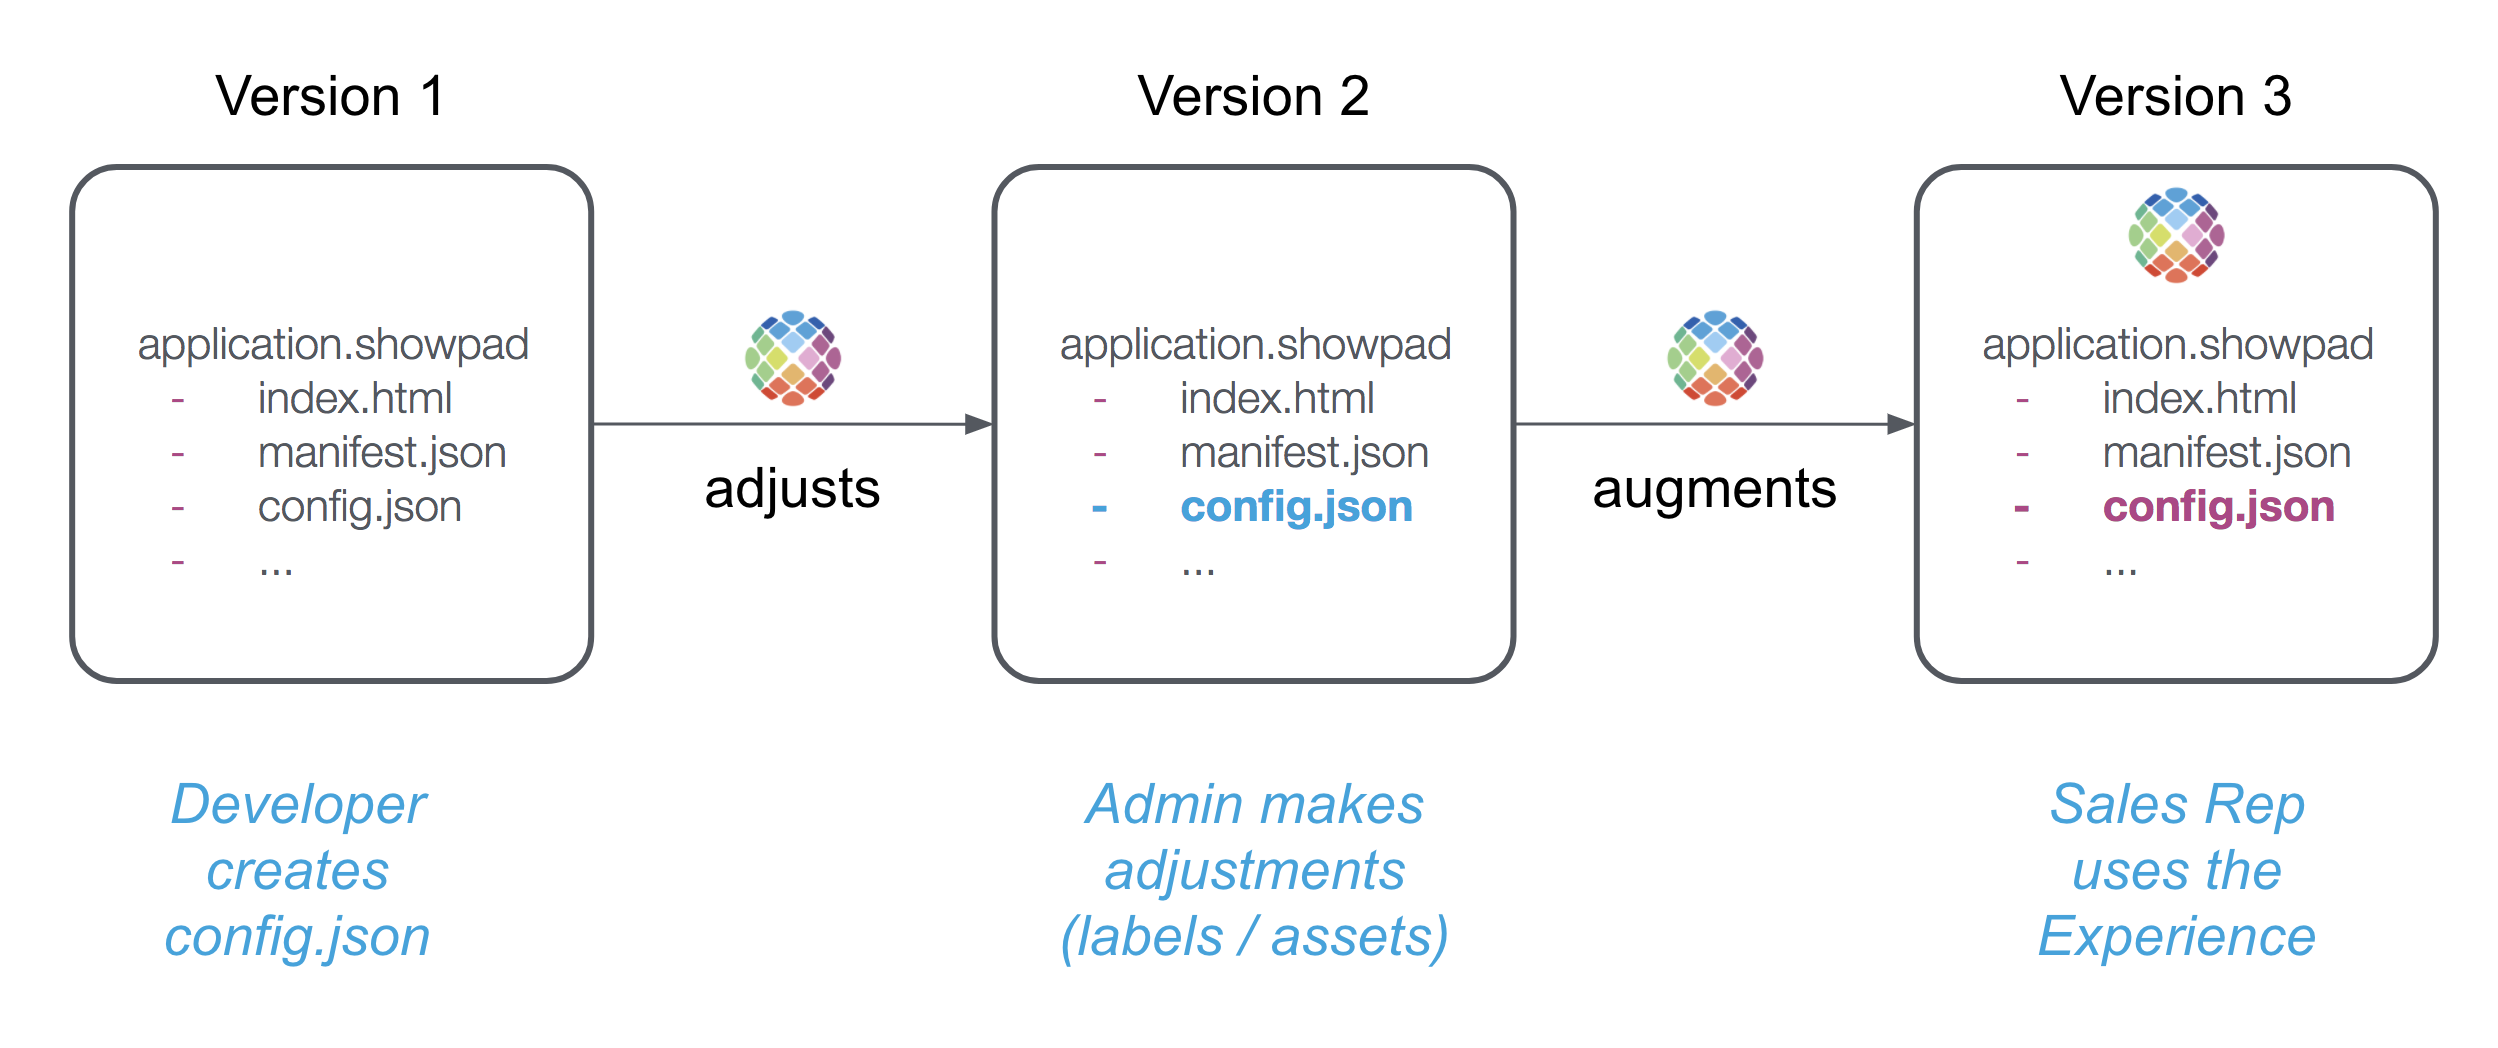
The only difference between those 3 versions is the config.json.
| Config.json | Description |
|---|---|
| Version 1 | The config.json that is written by the developer and is bundled in the application.showpad package |
| Version 2 | The config contains the changes done by the marketing admin in the Online Platform |
| Version 3 | The config is augmented with data about all mentioned Showpad assets. |
This is described in detail on this separate page.
Step by Step guide
Create Project
mkdir someproject
cd someproject
npm init
Install the SDK
# Local install
npm install --save-dev @showpad/sdk

# Global install
npm install -g @showpad/sdk
The Showpad CLI is now available
# Local install
npx showpad --help

# Global install
showpad --help
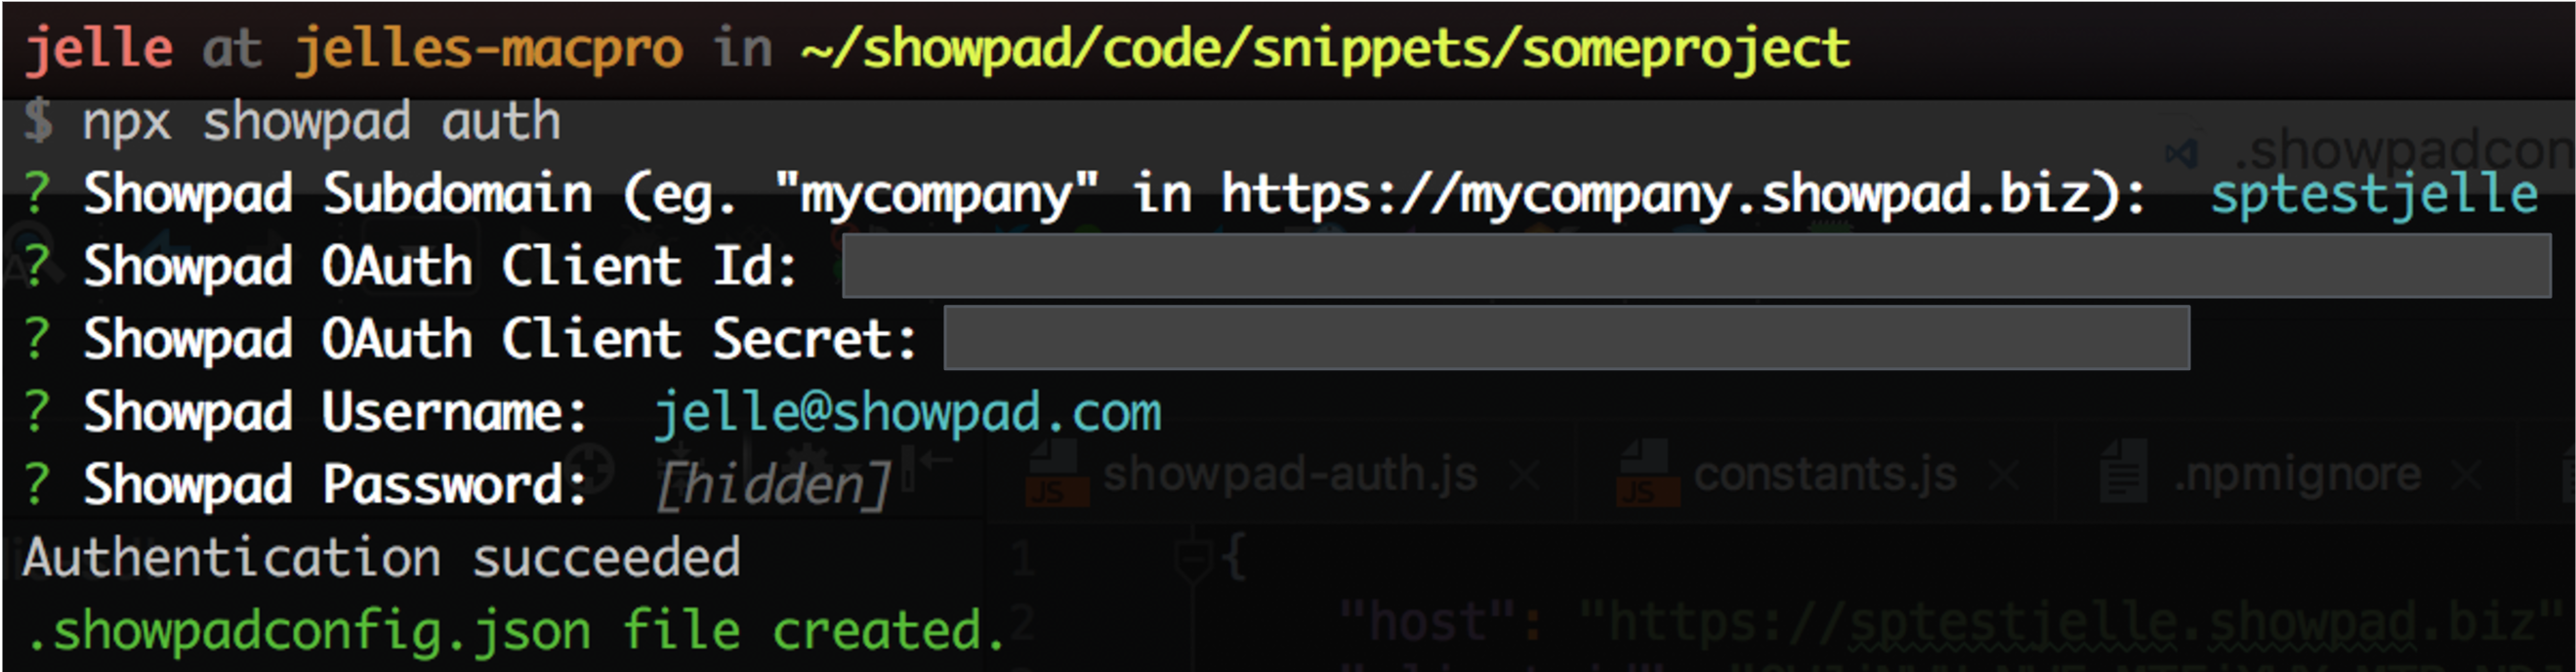
Authenticate
This is needed to run your Experience App in the local Showpad container. You’ll need to create an OAuth2 Client in Showpad:
- Login in to the Online Platform of Showpad
- Go to Settings > Integrations
- Click “Manage OAuth Clients”
- Click the “+” to add a new OAuth Client.
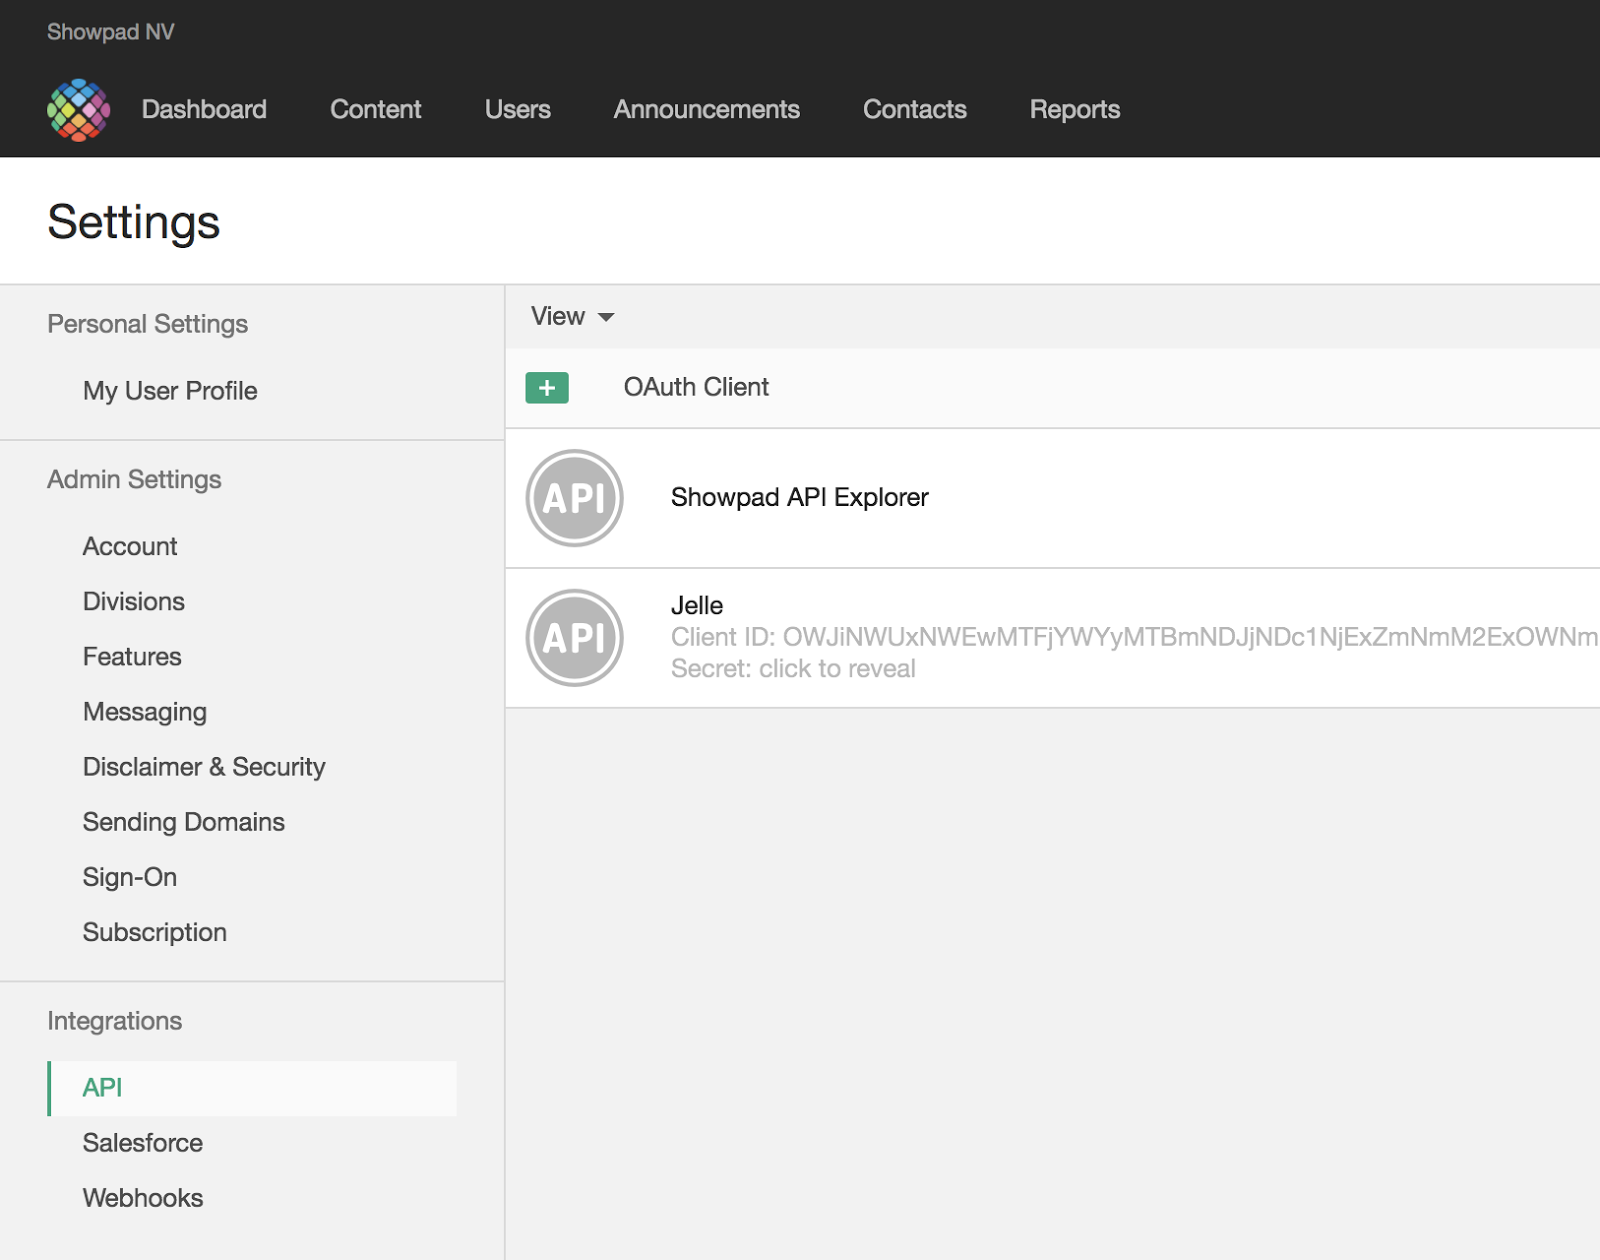
- Fill in the form (make sure all checkboxes are checked)
- Copy the “Client ID” and “Client Secret”.
- Run
npx showpad authand follow the wizard.
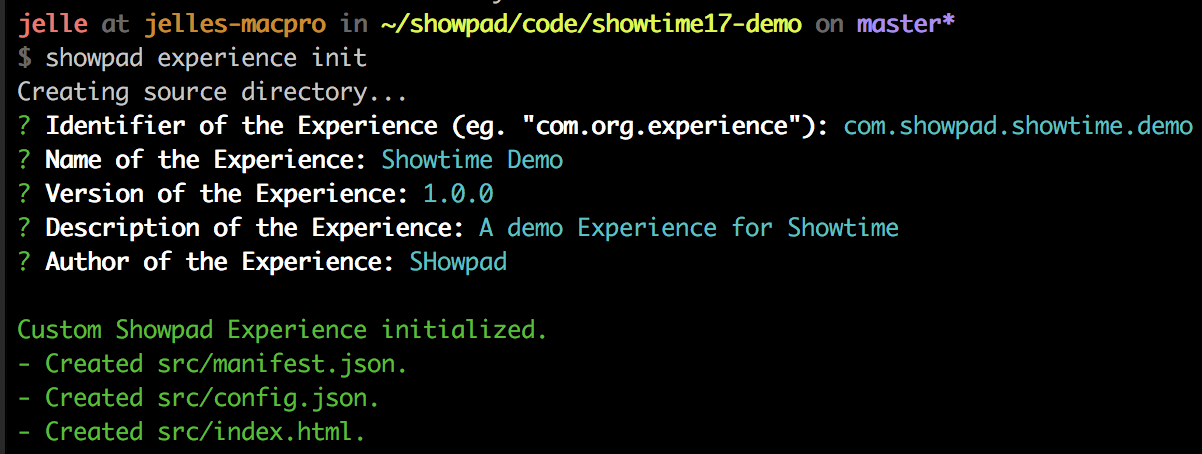
Initialize Experience App
Run showpad experience init and follow the wizard.
This is required to upload your Experience App on Showpad.
After this command is run, we create a basic folder structure and create the 3 required files for the Experience: index.html, manifest.json and config.json.
Your current folder structure can now look like this:
.showpadconfig.json
package.json
package-lock.json
src/
    manifest.json
    config.json
    index.html
node_modules/
Test the Experience App
A basic Showpad container is provided that implements the Javascript API to test the Experience App on your local development. To run it, call showpad experience serve.
The contents of the src folder will be shown within the Showpad container.
When you have your own build system like webpack or gulp, we assume it will host your app at another location (eg. “http://localhost:3000). Use the --host option to specify this.
The architecture of this container looks like this:
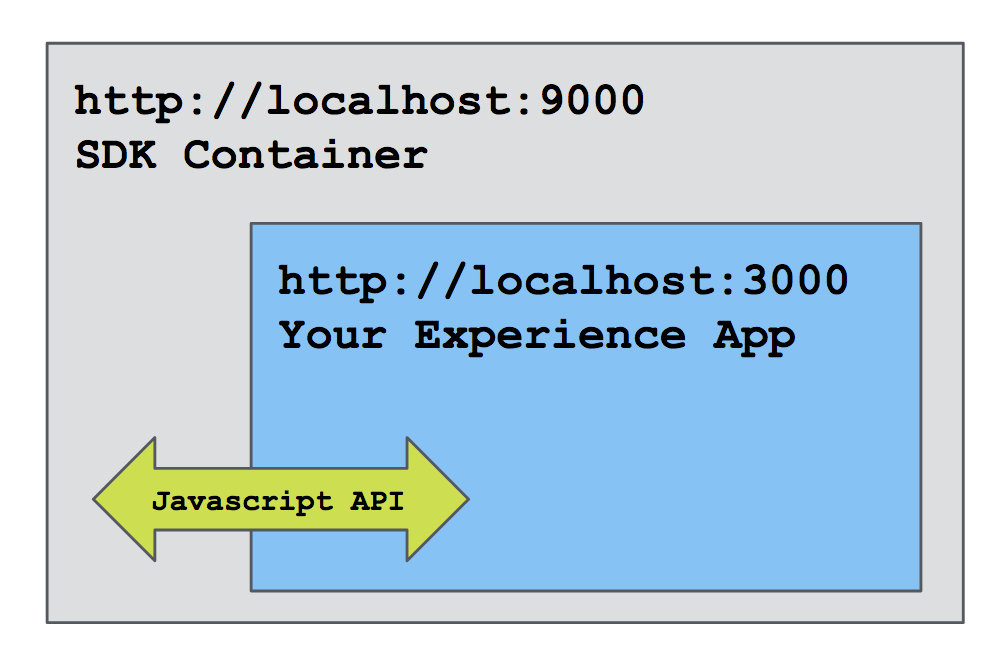
http://localhost:9000is the container that implements a basic version of the Javascript API and loads your app inside an iframe.- Your Experience App is either the
srcfolder being served or a proxy to the provided location via the--hostoption.
Develop the Experience App
Create your full Experience App using your favourite framework and tools.
To integrate with Showpad, you can use the Javascript API.
Javascript API
The Javascript API is injected in the iframe (your app) at runtime. When this is done and the Javascript API is available, the method window.onShowpadLibLoaded(); is executed. The container does all of this for you, which makes it easy to simulate as if your Experience App is run within Showpad.
npm run start
Putting this in scripts inside package.json makes it easy to run.
When you have your own build tool like webpack or gulp, we suggest the following configuration to run them at the same time using npm-run-all.
 "scripts": {
    "start": "npm-run-all --parallel local-serve showpad-serve", // This will run both scripts below at the same time
    "local-serve": "{start up your app}",
    "showpad-serve": "showpad experience serve"
    ...
  },
Note: When calling showpad inside scripts in package.json, using npx is not necessary.
showpad experience serve has several options:
-h, --host [host]: Specify the url to render.-c, --config [config]: Config file to use. Defaults to .showpadconfig.json-p, --port [port]: Port on localhost to run the container on. Default is 9000
Tips
The sidebar allows you to configure the response that will be sent when calling ShowpadLib.hasFeature().
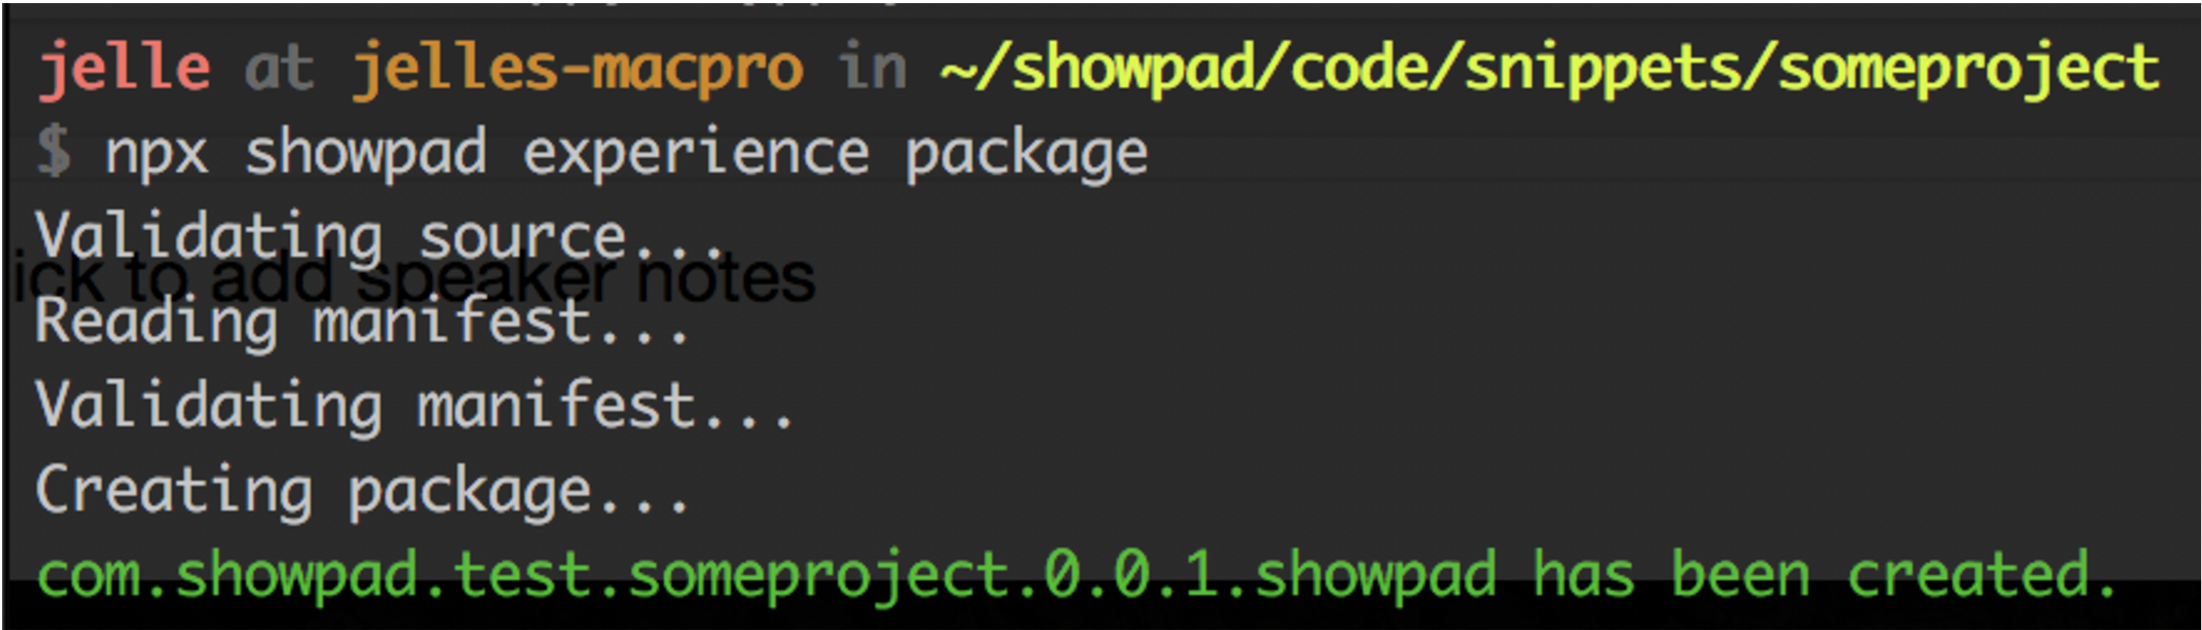
Package the Experience App
To upload the Experience App in Showpad, you’ll have to package the Experience App using showpad experience package command.
By default it takes the contents of the ‘dist’-folder and outputs it to the current directory. But it’s configurable (use --help to see the options).
This will generate the final {identifier}.{version}.showpad (eg. “com.showpad.someproject.1.0.0.showpad”).
This package should then be uploaded into the Online Platform as an Experience App.
Upload the Experience App
Through the Online Platform, you can upload your Experience App. Part of that process is a validation step to check if the package meets our requirements.
The table below contains an overview of the possible validation errors.
| Key | Message | Description |
|---|---|---|
| wrong-extension | The bundle should have the .showpad extension | Your package should have the .showpad extension |
| invalid-bundle | The bundle could not be read/extracted | The bundle was incorrectly packaged. Best to use the SDK for this |
| manifest-not-found | No manifest.json found | We could not find a manifest.json file in the package |
| manifest-invalid-format | The manifest.json file could not be read | The contents of the manifest.json file should be valid JSON as described above |
| manifest-invalid-contents | The manifest has invalid contents | Identifier and version are not found in the manifest. See above for the correct structure |
| invalid-version | The given version in the manifest is invalid | This version is already used and was used during another upload |
| no-index-found | No index.html found | We could not find an index.html file |
| config-invalid-format | The config.json file could not be read | The config.json file is invalid JSON |
| config-invalid-contents | The contents in config.json could not be parsed | The contents member in config.json has invalid data. (Could be wrong types, wrong structure, …) |
| config-invalid-labels | The labels in config.json could not be parsed | The labels member in config.json has invalid data. (Could wrong structure, …) |
| Version in error | Filename(s) include(s) unsupported characters | The following characters are not supported in filenames /, ?, #, @, !, $, &, *, +, ;, = |